Description
- Gift Envelope Includes – Unassembled Model Easy to Follow Instructions
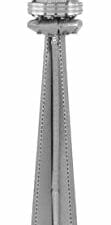
- From Steel Sheets to Museum Quality 3D Model
- Assembled Size 5.85×0.3×1.75 inches
- No Glue or Solder Needed
- Ages 14+
Create Your Free Price Drop Alert!

Showcasing a large selection of Scale Model Kits.


$21.06
| Product Dimensions | 4.88 x 0.08 x 6.77 inches |
|---|---|
| Item Weight | 1.13 ounces |
| Item model number | MMS001 |
| Manufacturer recommended age | 14 years and up |
| Is Discontinued By Manufacturer | No |
| Department | San Francisco |
| Manufacturer | Fascinations |


Cristina –
The metal cut out is very delicate. It bends easily and need to be careful when cutting it out. It’s smaller than I expected but I was able to make it work with for my sons project.
Lydia –
I wanted a Golden Gate Bridge to use as a Christmas ornament and couldn’t find ANYTHING, so I bought this, assembled it, and looped a piece of thread through the cables for my Christmas tree. It looks pretty good! This required some time and care to assemble. I probably spent over an hour on it and worked cautiously. The metal is thin and easily bent out of shape, but if you are careful, it’s fine. I’m a detail oriented person, so I didn’t have any problems, but I was still a little surprised at how long it took. Then again, I don’t ever build models, so if you’re a model builder, this is probably pretty easy by comparison. I was really glad I had some small jewelry pliers—I started off with my regular needle nose pliers, and those would NOT have ended well! It was just too delicate a task. Once assembled it looks nice and looks like the picture. I do wish it were a little more stable though. Despite my best efforts to get the tabs tight it is still wobbly. I think it will stay together ok, and since it is just a Christmas ornament it doesn’t need to be very sturdy, but if it was sitting on a desk or being picked up regularly I might be a bit concerned about it. I also bought the cable car model, and this one was probably the easier of the two to construct, although I had to be more careful not to bend this one.
Soulrider –
This was an easy and fun Metal Earth model to put together. I make sure to put which model I’m reviewing in the title of the review because for some reason some of the reviews for these models end up showing up under different models. Many of the reviews under the Golden Gate Bridge model are actually for the black pearl ship model. Anyway, I’ve put together a few of the Metal Earth models now and this one was pretty easy. There really were no difficult bends in it. You do need to pay extra attention to the detail laser etched into the pieces and which way they should face. Some pieces may fit either way but the laser etched detail should go a certain way so that it is visible when the entire model is put together. There are a couple of vertical upright pieces on the Golden Gate model where the laser etched detail should go toward the “inside” of the bridge toward the middle deck/roadway. That is so you can see the detail if you look at that upright from the perspective of the inside of the bridge. It’s easy to get used to putting those vertical pieces a certain way (based on the laser etched detail) and when you get to ones on the inside, put them the wrong way so you end up not seeing the detail from the one side. As with all of these models I suggest a small needle nose pliers with flat/smooth jaw as opposed to one with teeth. You can make sharp bends with the flat edge of the jaws on the pliers but I usually prefer for longer pieces to make straight, sharp bends with a metal ruler. It provides a nice, hard, straight edge for bending, especially right angles. I also usually go to the Fascinations web site to look at the PDF of the assembly instructions which you can download free of charge and also look at the 360 degree view of the model so that I can see a detailed picture of what the model should look like assembled. The 360 degree view of the model can be rotated all the way around and you can zoom in and out on the photo. You can also see top and bottom photos of the model. This can help a great deal in seeing how specific pieces should go together vs just looking at the flat drawing on the PDF or printed instructions. I also use the 360 degree picture to see if there are any tricky bends and if I think the model is within my skill level. Be careful, it’s very fragile so a light touch is needed when assembling it. You also have to be careful with all the models since the metal is very thing and can only be bent so many times before it breaks. This includes the tabs if you should put something together wrong and need to disassemble it and put it back together a different way. If you’re careful, pay attention to detail then this is a pretty easy model to put together.
Jeni –
The concept of making a model out of photo etched parts is not new, the new thing here is that it is put together by a series of tabs and slots recquiring no CA adhesive normally used in PE models. The parts being CAD generated are 100% accurate, but the manufacturablity factor is on the difficult side. The instructions give a sequence of assembly which is not practical most of the time. one must build several of those models to reach ones own sequence of assembly. It is definitley not for youngsters/kids, and one does not “popout the pieces” “put them together” you will need a cutting board and a heavy cutter, plus a bunch of different bending pliers, not the needle nose suggested as a tool in the instructions. The parts have to be handleed very carefuly as a light bend will ruin the highly polished surface effect aimed at by the manufacturers of the model. You have two ways of attaching parts, either through twisting a tab,which gives the strongest and easiest connection, or by bending a tab, which is not always easy without using a supporting tool or piece of metal. The finisheed product is very impressive, if you do not mind the exposed tabs, in other words it is on the abstract side rather than the pur accurate model type. Very enjoyable if you have the right tools and a loup.
Cristina –
Arrived 2 days after ordering.
This is my first time doing a miniature 3d puzzle and I would recommend this one for beginners. It was still challenging to figure out what worked best but once I got the hang of it, constructing the piece was not difficult.
The instruction manual says that you’ll need wire cutters and tweezers or needle nose pliers.
I did not have any wire cutters that were small enough to cut the pieces from the metal sheet so I wiggled them around a bit to get them to disconnect. This warps the pieces a little bit but it’s still possible to construct the bridge without any issues.
I only used tweezers to bend and twist the tabs. The instructions are coherent and easy to follow.
This took me less than an hour to put together and I’m happy with the results.